I had taken several pictures of Kalifa and yeah I loved those pictures. I took one of my favorite and edited the picture on Corel PHOTO-PAINT.
The picture above was the original file from my favorite one. If you view it closely or closer, you'll see a lot of grains (noise) and it doesn't look so cool. I found a big area of noises so I decided to edit the picture.
After the picture had been loaded, I clicked 'Adjust' menu and chose 'Image Adjustment Lab' submenu. The box like shown above would appear. It had 2 pictures, the picture in the right side was the preview of the settings. I set the temperature, saturation, highlights, midtones, shadows, and else. The changes were shown above. But, it looked like the temperature of the picture was warm and actually I loved when it was blue so I made new settings of temperature.
Nah, by setting the temperature level, saturation, and other triggers I would get new-cool picture. Note two snapshots under the two main and preview pictures. I could call it 'preset'. I loved the new one so I chose the 'blue' one.
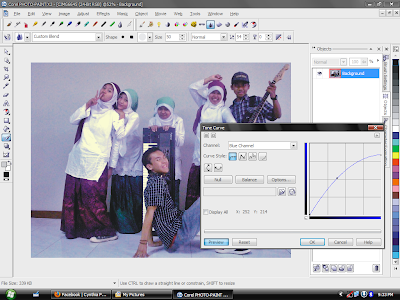
But it wasn't blue enough for me so again I had to set the tone curve.
You might try to adjust the tone by yourself by dragging the curve, adding nodes to create a curve and more. I added a node and created a curve, dragged and adjust it until I got the result I wanted. And the picture above looked a bit saturated like old-photograph :D
Noise! The picture still had an amount of noise area. I could eliminate the noise by using Smart Blur effect. I clicked on 'Effect' menu, chose 'Blur' and chose 'Smart Blur'.
Smart Blur could smartly eliminate noise appearing in the picture. But, it'd be better to not use a large amount of blur. I set it into 4 and it was enough to eliminate the noise. Okay, so then what else would I do? Yap! I got the result and..
Tadaaaaa!
Kalifa : I Love When It's Blue!


No comments:
Post a Comment
Post some comments, maybe a word two words or a long long paragraph :)